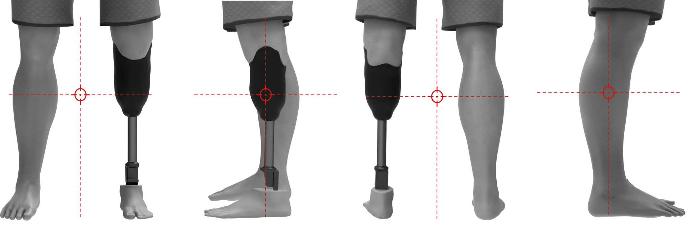
STEP 1: Take 4 photos
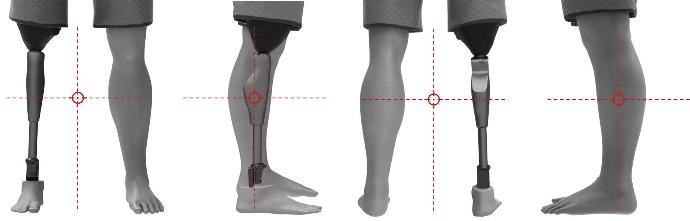
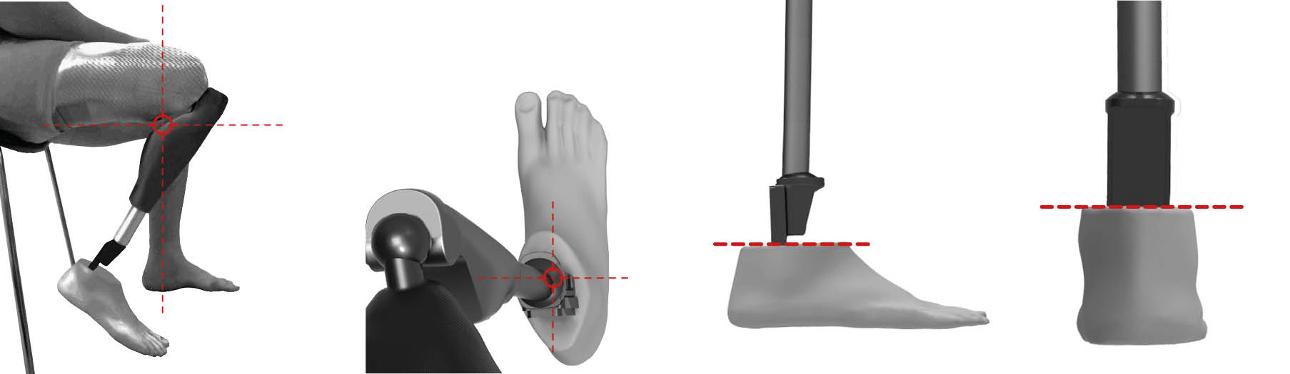
Take 4 photos of the user wearing the prosthesis, as shown in the images above. The camera must be placed perpendicular to the legs, in a low position, and both legs must be centered on the photo. Please remember that all prosthetic components must be completely visible, including the socket. Please remove shoes, socks and any object that covers the prosthesis.
STEP 2: 3D Scanning
- All prosthetic components should be clearly visible on the scan, including the lower part of the socket. Please remove any item that covers the prosthesis (sock, foam, other coverings ...)
- No reflecting ground: Avoid problems with reflective material or dark areas. If your scanner does not receive information from these areas, cover the reflective parts with matt tape, tightly taped to the surface so that it does not create extra bulk.
- We recommend that the environment contrasts in color with the prosthesis.
- Set the scanner to the highest resolution possible.
- Scan the complete prosthesis and the sound leg, with the patient standing up. You can scan both legs in the same file or do it separately.
Important!

No shoes
No socks

Formats
Structured light scanners
Recommended Scanners
Recommended
- Einstar Scanner
- Shining 3D Einscan Pro Series Hand Scanners
- Artec Structured Light Hand Scanners
- Creaform Hand Scanners
- Peel3d 3D Scanner
Not recommended
- 3D Systems / Cubify Sense
- Structure Sensor / Core
- Microsoft Kinect 3D Scanner
- Intel Infrared Sensor Scanners
STEP 3: Send
Send us the photos taken and the scan file to orders@unyq.com. You can use free services such as WeTransfer, Google Drive, Dropbox, etc. If you need assistance, please contact us at
STEP 1: Take 4 photos
Take 4 photos of the user wearing the prosthesis, as shown in the images above. The camera must be placed perpendicular to the legs, in a low position, and both legs must be centered on the photo. Please remember that all prosthetic components must be completely visible, including the socket. Please remove shoes, socks and any object that covers the prosthesis.
STEP 2: Take 4 photos of the prosthesis
1. Max flexion
Take a photo of the
prosthetic knee from the outside at max flexion.
2.Top lateral
Position the camera next to the lateral side of the socket looking down.
3.Lateral (foot)
Position the camera so the top of the foot shell looks like a straight line.
4. Back (foot)
Position the camera so the top of the foot shell looks like a straight line.
STEP 3: Send
Envíanos las fotos tomadas y/o el archivo de escaneo a orders@unyq.com. Puedes utilizar servicios gratuitos como WeTransfer, Google Drive, Dropbox, etc. Si necesitas asistencia, por favor contacta con nosotros en +34
STEP 1: Take 4 photos
Take 4 photos of the user wearing the prosthesis, as shown in the images above. The camera must be placed perpendicular to the legs, in a low position, and both legs must be centered on the photo. Please remember that all prosthetic components must be completely visible, including the socket. Please remove shoes, socks and any object that covers the prosthesis.
STEP 2: 3D Scanning
- All prosthetic components should be clearly visible on the scan, including the lower part of the socket. Please remove any item that covers the prosthesis (sock, foam, other coverings ...)
- If the patient is wearing a prosthetic knee sleeve, keep it on the prosthesis and fold the remaining fabric into the socket
- No reflecting ground: Avoid problems with reflective material or dark areas. If your scanner does not receive information from these areas, cover the reflective parts with matt tape, tightly taped to the surface so that it does not create extra bulk.
- We recommend that the environment contrasts in color with the prosthesis.
- Set the scanner to the highest resolution possible.
- Scan the complete prosthesis and the sound leg, with the patient standing up. You can scan both legs in the same file or do it separately.
Important!
No shoes
No socks
Formats
Structured light scanners
Recommended Scanners
Recommended
- Einstar Scanner
- Shining 3D Einscan Pro Series Hand Scanners
- Artec Structured Light Hand Scanners
- Creaform Hand Scanners
- Peel3d 3D Scanner
Not recommended
- 3D Systems / Cubify Sense
- Structure Sensor / Core
- Microsoft Kinect 3D Scanner
- Intel Infrared Sensor Scanners
STEP 3: Send
Send us the photos taken and the scan file to orders@unyq.com. You can use free services like WeTransfer, Google Drive, Dropbox, etc. If you need assistance, please contact us at
STEP 1: Take 4 photos

Take 4 photos of the user wearing the prosthesis, as shown in the images above. The camera must be placed perpendicular to the legs, in a low position, and both legs must be centered on the photo. Please remember that all prosthetic components must be completely visible, including the socket. Please remove shoes, socks and any object that covers the prosthesis.
STEP 2: BK Kit set-up
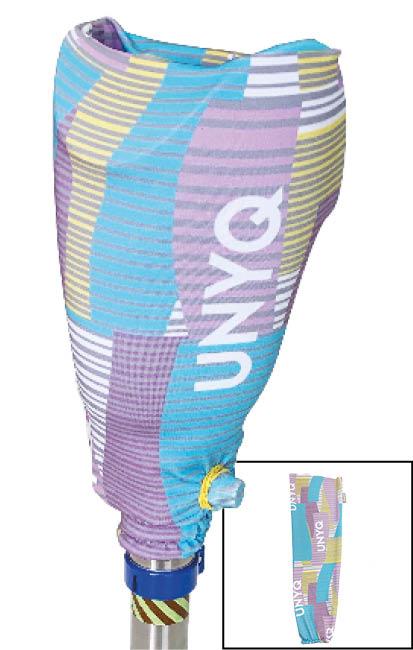
Patterned sleeve
Place the patterned socket sleeve covering the whole socket. If your patient wears a prosthetic knee sleeve, place the patterned
sleeve over it. Please tuck in the remaining fabric and sleeve inside the socket itself and tighten hard with
the drawstring.
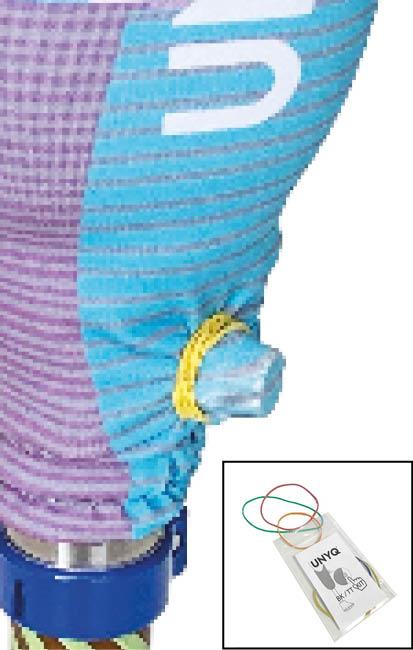
Rubber bands
Place rubber bands
around valves, lock
systems, or anything
that stands out from the socket. Also, ensure the string is tucked into the sleeve.
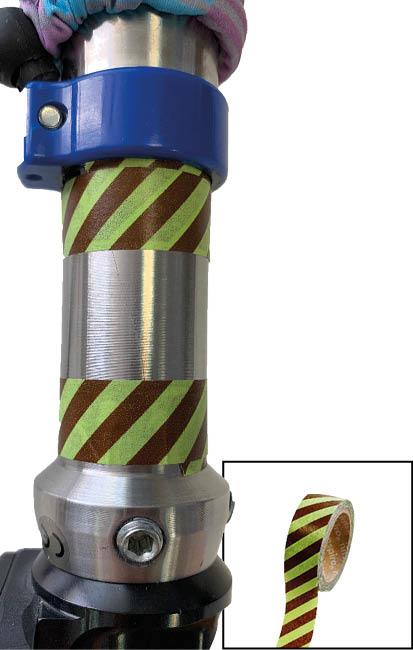
Geometrical tape
Find a smooth and
cylindrical part of
the pylon, and place
geometrical tape at the top edge, middle and bottom edge, if possible. If the prosthesis doesn’t have a pylon, place the tape around an adapter.
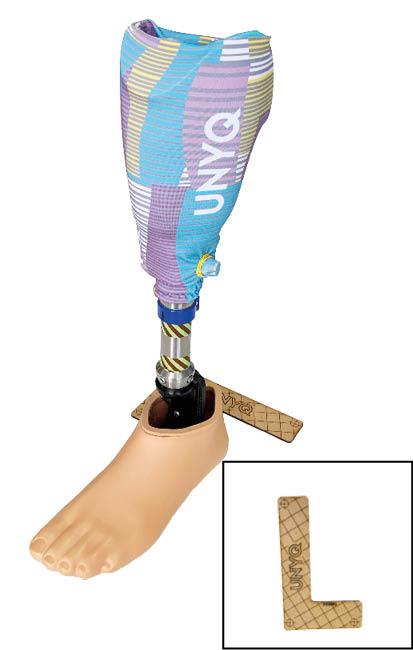
L-shaped ruler
Place the prosthesis
on a flat surface (table
or bench) where you
can walk around it, and place the L-shaped ruler behind the heel of the foot. Please hide the sock of the foot inside
the cosmetic shell.
STEP 3: Take 60 photos of the prosthesis
- Choose a room with good, stable lighting. Avoid opened windows that create glare.
- Ensure there are no mirrors or reflecting objects.
- Clear the background behind the prosthesis.
- There must be no other people in the room, to avoid interferences.

Camera position at level 1
Camera position at level 2
You must now take a series of photos from your phone or camera as you walk around the prosthesis. You must walk around in 2 different levels ant take 30 photos per level, a total of 60 pictures.
The first series must be taken from chest height looking down, and you must walk around the prosthesis at a slow and steady pace. You must take 30 pictures as you walk around the prosthesis (1 round).
Now you have to take the second series. This may be taken from waist height. You must take again another 30 pictures on this level, as you walk around the prosthesis.
STEP 4: Send
Send us the photos taken and the scan file to orders@unyq.com. You can use free services like WeTransfer, Google Drive, Dropbox, etc. If you need assistance, please contact us at